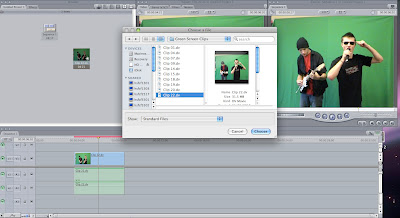
Before starting the green screen i had to open up FinalCut and then import a clip to start editing. I shortened the clip by using the mark in button to select the start of the clip i then used the mark out button to show where i wanted the clip to end. I then had to crag the clip into them time line at the bottom.
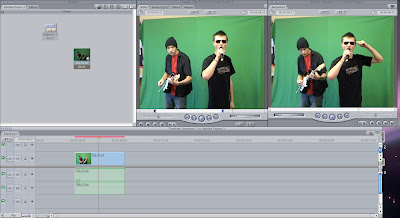
Once the clip had successfully moves into the time at the bottom, i then had to render the clip so i could edit the green screen and also so i could view it in the review window. To start editing the slip i had the place the little bar in the middle of the clip on the time line to make sure that i hat the clip selected. I then had to double clip the clip so that it went purple. Once i had done this i then had to locate chroma keyer so i could begin to key the green out. To locate this you have to go on effects, then down to video filters, then down to key and click on chroma keyer.
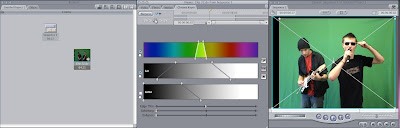
When chroma keyer had loaded i had to take a sample of the green from the green screen once i had done this i had to use the colour spectrum to make sure i had selected hr right types of green so it would be easier to key more green out. I then used the sateration key and dragged the guides to either end of the spectrum. I also used the Luma key i used this in the same way i used the sateration. I also used the soften button so smooth out the black. At the end of this all the green should have gone and the background should all be black.
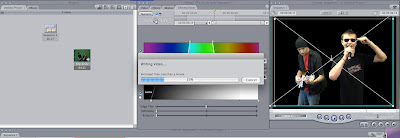
This is what the background should look like after all the green has been keyed out. After successfully getting rid of all the green screen i then had to render the video so that i could edit it further.
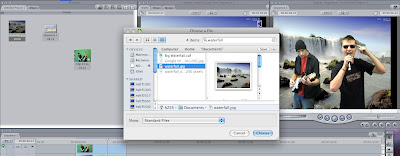
Once the video had been rendered i could then add an image or video clip to the video to use a background for the video. I inserted a picture of a waterfall to use a the back drop for the video, I had to make sure that the image was a jpeg image before adding it to the video. I had to drag the image in to the time line and place it in the layer below the video so that it would appear behind the clip. I then had to cut the image with the razor button so that it was the same length as the video clip and then i had to render it so i could view it.
No comments:
Post a Comment